Painted Heraldic Standards
Magistra Rosemounde of Mercia (copyright Micaela Burnham 2011)
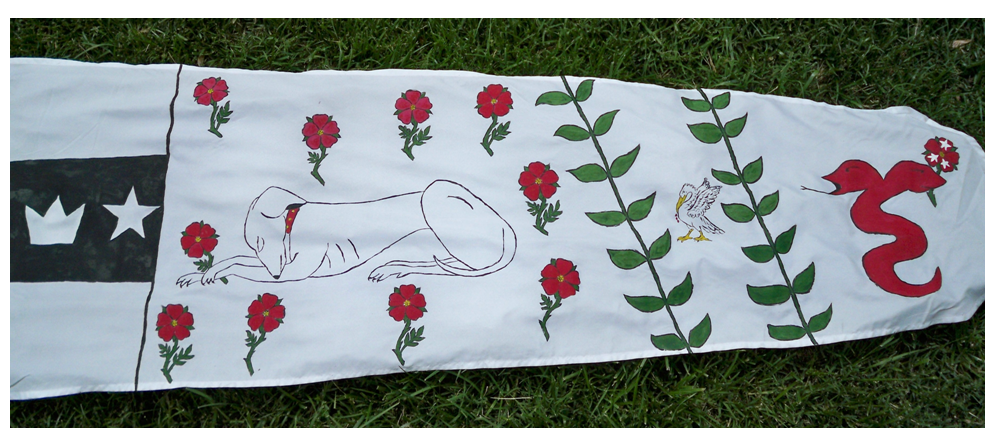
Standards: a standard is a flag that is long and narrow, usually displayed at the top of a tall pole or a tent pole or poles. Unlike a formal banner or other European heraldic display where the arms proper are displayed, the standard is more general. It can incorporate charges from your arms, but may also include household and Kingdom symbology, and charges that represent your interests and awards—the exception to this being a laurel wreath, which is reserved for groups in the SCA. I use laurel branches that are straight on mine. It may also include a personal or household motto. There are depictions of standards in period works of art, and there are extant fragments of painted banners in museums.
SCA traditions and sumptuary laws: It is the tradition or law within some Kingdoms that standards may only be displayed by persons of certain rank, such as peer. In my Kingdom, Meridies, this is the tradition, though there is no law prohibiting it. Please read the sumptuary laws in your Kingdom, and check with the heralds and historian about traditions. Where heraldic standards are mentioned in sumptuary laws, they may also give maximum lengths and how high they may be displayed.
Period Construction of standards: If any extant examples specifically of standards, I am unaware of them. There are extant banners and other forms of heraldic display, although most of these are fragments. Of the existing pieces, most of these are painted. Some have appliqué and/or embroidery, but these are very rare. In general, heraldic display was painted. The material painted on depended on usage. If they were meant to hang straight and not be blown around by the wind, the fabric would be heavy, perhaps even weighted. Linen, hemp, and even leather were used. The extant example that I have viewed were simply paint on fabric, but gesso was sometimes used under the paint as a stiffener and to hold the paint on the fabric. For a standard that is meant to flutter in the slightest breeze, the fabric would have to be very light, which in period meant silk. Painting on silk is a bit trickier because a thin water or oil based paint will bleed instead of maintaining a crisp clean line.
SCA construction of standards: In the SCA, the most common method of constructing standards is to use resist dying on silk. Resist dying involves stretching the standard on a frame, apply the ”resist,” a mastic or gum material used to outline the figures that prevents the dye from going outside that line, then using a dye for the colors inside the resist. This method requires special materials and tools, and a significant amount of space for making the frame and mounting the standard to it. This is also not a period technique for Europe in the middle-ages or Renaissance although it may have been used in India and China. Batik is a form of resist dying that uses wax as the resist. Although this specific methodology of resist dying was not used in period, there were certainly methods for preventing paint from going where it wasn’t wanted. Wax is most likely.
My method: My method for painting standards is much simpler and involves using only a fabric specific acrylic paint called Liquatex, sold for $6.00 for a large jar. Panther Primitives sells it, and it is widely available in craft stores. A little goes a long way, so it is very economical. Liquatex can be used on all fabric types, from heavy canvas to silk. My own standards are a good quality fake silk. I used artificial, because my standards are on the tent poles at the top of tent and sit out in all kinds of weather for extended periods of time. You can certainly use real silk, but keep in mind that the silks we get today are subject to fraying, and most are not woven nearly as tightly as period silks.
Magistra Rosemounde of Mercia (copyright Micaela Burnham 2011)
Standards: a standard is a flag that is long and narrow, usually displayed at the top of a tall pole or a tent pole or poles. Unlike a formal banner or other European heraldic display where the arms proper are displayed, the standard is more general. It can incorporate charges from your arms, but may also include household and Kingdom symbology, and charges that represent your interests and awards—the exception to this being a laurel wreath, which is reserved for groups in the SCA. I use laurel branches that are straight on mine. It may also include a personal or household motto. There are depictions of standards in period works of art, and there are extant fragments of painted banners in museums.
SCA traditions and sumptuary laws: It is the tradition or law within some Kingdoms that standards may only be displayed by persons of certain rank, such as peer. In my Kingdom, Meridies, this is the tradition, though there is no law prohibiting it. Please read the sumptuary laws in your Kingdom, and check with the heralds and historian about traditions. Where heraldic standards are mentioned in sumptuary laws, they may also give maximum lengths and how high they may be displayed.
Period Construction of standards: If any extant examples specifically of standards, I am unaware of them. There are extant banners and other forms of heraldic display, although most of these are fragments. Of the existing pieces, most of these are painted. Some have appliqué and/or embroidery, but these are very rare. In general, heraldic display was painted. The material painted on depended on usage. If they were meant to hang straight and not be blown around by the wind, the fabric would be heavy, perhaps even weighted. Linen, hemp, and even leather were used. The extant example that I have viewed were simply paint on fabric, but gesso was sometimes used under the paint as a stiffener and to hold the paint on the fabric. For a standard that is meant to flutter in the slightest breeze, the fabric would have to be very light, which in period meant silk. Painting on silk is a bit trickier because a thin water or oil based paint will bleed instead of maintaining a crisp clean line.
SCA construction of standards: In the SCA, the most common method of constructing standards is to use resist dying on silk. Resist dying involves stretching the standard on a frame, apply the ”resist,” a mastic or gum material used to outline the figures that prevents the dye from going outside that line, then using a dye for the colors inside the resist. This method requires special materials and tools, and a significant amount of space for making the frame and mounting the standard to it. This is also not a period technique for Europe in the middle-ages or Renaissance although it may have been used in India and China. Batik is a form of resist dying that uses wax as the resist. Although this specific methodology of resist dying was not used in period, there were certainly methods for preventing paint from going where it wasn’t wanted. Wax is most likely.
My method: My method for painting standards is much simpler and involves using only a fabric specific acrylic paint called Liquatex, sold for $6.00 for a large jar. Panther Primitives sells it, and it is widely available in craft stores. A little goes a long way, so it is very economical. Liquatex can be used on all fabric types, from heavy canvas to silk. My own standards are a good quality fake silk. I used artificial, because my standards are on the tent poles at the top of tent and sit out in all kinds of weather for extended periods of time. You can certainly use real silk, but keep in mind that the silks we get today are subject to fraying, and most are not woven nearly as tightly as period silks.
DIRECTIONS FOR PAINTED HERALDIC STANDARDS
I. Design the standard
A. Remember the standard can be much more than your arms. Consider using the Kingdom arms or populace badge, symbols or your awards, your household, and your interests in the SCA.
B. Set the finished dimensions of your standard. Decide on length, width, and how it will be displayed; single tall pole, tent topper, etc. Check the sumptuary laws for your Kingdom—they have maximum lengths depending on your status. Remember that tent toppers should be shorter that one displayed from a tall pole to avoid twisting and sticking problems in wind and rain.
C. Do a TO SCALE drawing of the standard using graph paper. Put all of your design elements in place. If it seems unbalanced or you don’t like some elements, now is the time to fix them.
D. Decide on the colors and mark them. Do not get carried away with color. Limit yourself to black and three colors. Too many colors will make the standard look fussy.
E. Decide how the standard should attach to the pole. There are two methods: ties and sleeves. With ties, they simply tie onto the pole. A sleeve is a separate piece of fabric that is sewn to the back end of your standard that makes a casing for the pole to go through. Ties are easier but less secure. A sleeve is more secure, but restricts the standards movement more.
F. Design the pole structure(s). A single pole should be tall enough that the standard will not touch the ground. It is a good idea to put a cap or finial at the top of the pole to make sure that the standard cannot come off the top in a wind. You may also want to have a “stop,” i.e. a rubber gasket or some wrapped cord just below the width of the standard to keep it from sipping down the pole.
G. Decide on what materials you will use: real silk or fake silk and materials for the ties or sleeve (I recommend Trigger or other heavy sports cloth for sleeves and heavy twill tape for ties.). Calculate the amount of fabric you will need, allowing for hems and seams. Decide on your pole materials as well and calculate how much of what you will need. The fabric should always be white. Make a list of paint colors. You will always need black for the outlines. You will also need one or two thin plastic drop cloths—get the very thinnest, a fine point black Sharpie or other permanent marker, and butcher or craft paper for doing a full scale drawing of the standard. If you do not have a variety of small paint brushes and a plastic palette for acrylic paints, you will want to get these as well.
II. Construct your standard
A. Purchase all of your materials so that they will be available when you need them.
B. Construct your pole, but do not paint it yet.
C. Cut out your standard, using your predetermined dimensions, and allowing 1 inch extra all the way around for hems and seams.
D. Sew the standard. Turn under and iron ½ all the way around the standard except for the straight back end. Turn under and iron another ½ inch. Sew down this hem by hand or machine.
1. If you are using ties, repeat the hemming process for the straight back edge. Then cut the ties: each set of ties should be the circumference of the pole plus about 2 feet. Hem the cut edges, then fold in half and sew securely to the top and bottom of the standard. Two sets of ties is necessary, and you may need three if the standard is wide.
2. If you are using a sleeve, cut the sleeve fabric. The height should be the width of the standard plus 1 inch at the top and at the bottom. The length should be the circumference of the pole plus about 2 inches. Hem the top and bottom as you did the standard. Then place the sleeve fabric edge against the back straight edge of the standard, right sides together and pin about 1 inch from the edge. Sew. Then fold the selvedge back against the sleeve fabric and stitch it down about ½ inch from the seam, felling the fabric to keep it in place. Using the pole as a guide, wrap the sleeve fabric around the pole for a snug fit; but not too snug—you have to be able to get it on and off. Turn under the raw edge and pin the folded edge to the standard on top of the existing seam line. Remove the pole and stitch securely in place through all layers of fabric.
III. Drawn the cartoon
A. Using your butcher or craft paper, lay your standard out on the paper. With a pencil, trace all the way around it. Remove the standard. Make a line 1 inch all the way around the inside of your first line. If your standard has a sleeve, draw a line ½ inch to the inside of the sleeve seam. Go over all of these lines with a black permanent marker.
B. With a pencil, draw all of your design elements in their proper place. Stand up and look at it. Make sure you are happy with the design. The designs should not cross your inside lines. Put in as much detail as you will want in your finished design. Go over all of these lines with black permanent marker. In pencil, write in the correct colors for each element on them.
IV. Prepare for painting
A. Lay out a plastic drop cloth on a large table or floor area, large enough that the standard can be laid out flat. Make sure that the ink is completely dry and non-smeary to the touch.
B. But the paper cartoon face side up in the center of the drop cloth. Put your standard, right side up on top of the cartoon and pin the two together every six inches or so, and/or puts weights along the edges to keep them in place.
C. Using a dark, non-permanent pencil, trace all of the design elements onto the fabric. Do not put in the border lines—just stay within them. Look at your standard and make sure it looks the way you want it to.
D. OK, this is it—using your fine point permanent marker, trace over the pencil lines carefully.
E. Un pin the standard from the cartoon and remove the cartoon from underneath. Put it nearby to refer to for the colors.
V. Paint the standard
A. Paint the outlines. Thin some black paint very slightly, just enough to flow easily on the fabric. Remember, this will act as your “resist,” so it needs to be fairly thick. Paint over your marker lines trying to keep the lines as even as possible. Let the paint dry for at least 2-3 hours before proceeding. Check for dryness by touching the last place you painted very gently. If it is still tacky, give it another hour or so. Drying time will depend on temperature and humidity.
B. Paint the colored figures. Use your cartoon as a guide.
1. Thin the paint so that it flows easily and spreads to the surrounding areas within the lines. It should not have brush lines or thick paint sticking to the surface. You want it to act like a dye. Use scraps of fabric to experiment on before you paint the standard.
2. Paint the design elements. Start with the lightest color first, then next lightest, and so on, finishing with black.
3. When you are finished, let the standard dry for at least 24 hours.
C. Reverse the standard
1. Once the paint is completely dry—check before turning, peel the standard gently from the drop cloth. It may stick slightly, but should pull away with little difficulty.
2. Either turn the drop cloth over, or put down a fresh one. Then place the standard in the center, unpainted side up. You should be able to see your outlines and colors clearly, but they will be lighter than the other side.
3. Repeat painting the outlines as before. Let dry.
4. Repeat painting the colors as before. Let dry at least 24 hours.
Your standard is done!
1. You do not need to use heat (nor should you) or anything else to set the colors. Hang your standard up for a day or two before rolling it up to let the colors air dry and set.
2. Although you can fold your standard, rolling it around a dowel or pole is recommended practice for preserving the paint and avoiding fold lines.
3. Paint and decorate your pole as desired.
BIBLIOGRAPHY
The Art of Heraldry: An Encylopaedia of Armory, Arthur Charles Fox-Davies; 1976
Painters, from the “Medieval Craftsmen” series, Paul Binski; 1991, ISBN 0-8020-6918-5
The Très Riches Heures of Jean, Duke of Berry, Musée Condé, Chantilly; 1969, ISBN 0-8076-1220-X (for examples in period art of heraldic standards)
Heraldry and the Heralds, Rodney Jonathan Cape Dennys, London, 1984, ISBN 0-224-01643-1
Heraldry Sources, Symbols and Meaning, Ottfried Neubecker, Black Cat, London, 1988, ISBN 0-7481-0198-5
This is one of my standards that flies on the top of my tent.