Feasting at War
Rpsemounde of Mercia (copyright Micaela Burnham 2010)
Rpsemounde of Mercia (copyright Micaela Burnham 2010)
- Planning: planning is the key to all successful meals, period or not, camping or at home. For camp cooking, you need certain information in advance to be able to plan your menu, develop a shopping list, and prepare a cooking schedule.
- Information needed
- The type of cooking facilities that you will have. This includes the size and shape of fire pits and how they are equipped, whether there are propane or white gas stoves available, the types of cooking equipment and utensils available, coolers, washing facilities, hot water access, etc. Be thorough is asking about or viewing exactly what will be there for you to use. Will fire wood be already chopped?
- Whether you will have helpers for any or all of your cooking and/or clean-up.
- How many people you will be cooking for.
- When the meal is expected to be served.
- All dietary issues that your diners have; especially allergies and vegetarians.
- Planning the meal
- What type of meal are you doing?
- Breakfast/luncheon/dinner
- Historical time and place of the meal
- Complexity level
- Simple: 2-4 dishes and one course
- Moderate: 5 or more dishes and one course
- Complex: 8 or more dishes with one course
- Advanced: 8 or more dishes with multiple courses
- The written plan
- Sources: gather your sources together and choose recipes for the number of dishes that you are planning. Remember that you do not have to make everything. You may wish to purchase bread, cheeses, olives, etc. to supplement your meal.
- Make sure the meal is well balanced for protein, carbs, vegetables, and fruits. Make sure there are fiber rich dishes. This is not something that period cooks would have planned for in a meal, but they certainly would have considered what they believed to have been healthful in their own time—perhaps a balance of humours.
- Make sure there is no single ingredient in every, or a majority of dishes. This may present some issues with certain cuisines, but if one of your diners forgot to tell anyone that they are allergic to cinnamon, and you have it in every dish, it’s a problem.
- Recipes: Write out your recipes, adapting the ingredients and cooking techniques to your camping situation and cooking facilities.
- Schedule: Write out a schedule. It can be detailed or general, but you need to make sure that dishes get started on time to be finished when needed. The more detail you have, the less you have to rely on memory. The more dishes you have, the more detailed a schedule should be. Make sure to take into account the time needed for chopping wood, heating water, and the greater time needed for cooking without mundane appliances or equipment.
- Menus: Write out a full menu including any purchased items like bread or cheese. If you are doing something special, you may want to make copies for the diners.
- Sources: gather your sources together and choose recipes for the number of dishes that you are planning. Remember that you do not have to make everything. You may wish to purchase bread, cheeses, olives, etc. to supplement your meal.
- What type of meal are you doing?
- Information needed
- Period Cooking Techniques: cooking over a wood fire can be used exclusively for preparing your meal if you have the right equipment and enough fire.
- The fire pit or hearth: Your fire pit may be above or below ground, but should be fairly large—at least 6 square feet of cooking surface. You should also have multiple grills and a way to raise or lower the cooking surface to bring it closer or further from the fire.
- With a pit alone you can grill, roast over coals, roast in coals, boil, stew, poach, fry, sauté, and bake in a Dutch oven. With the addition of a spit, you can spit roast.
- You will need seasoned hardwood and wood chopping tools in order to properly prepare your fuel. An axe, wedge, and chopping block (a stump will do fine) are all the tools you really need. Someone with some experience chopping wood and making cooking fires is really necessary until others get the hang of it.
- High flames, medium flames, low flames, and coals (no flames) will give you all the temperature variation that you need.
- Observe fire safety: Have a water bucket and a fire extinguisher easily accessible to the fire area without being in it.
- Ovens: There are three basic styles of period ovens. Remember that no wood burning oven will hold as steady a temperature as a modern range oven. Also be sure to take into account that it takes 30-45 minutes for wood to burn down to smokeless coals. There is no reason why you cannot bake breads, pasties, or even custards in a period style oven. However, they are not efficient for roasting meats, which should be done over the fire.
- Dutch oven—a large heavy iron pot that can be buried in coals. The pot is heated all around with continuous heat as long as the coals stay hot. This technique is great for slow cooking meats and stews, but can also be used for baking breads with a little practice.
- Residual heat ovens—generally made of clay, brick, or both in period, in these ovens, a fire is made in the oven and left until the fuel is consumed and the oven interior is very hot. The coals are then removed and baking is done with the residual heat, held in with a sturdy, usually thick oak door. The heat in these ovens diminishes quickly after 30-45 minutes, and there is no way to reheat them. Most bread ovens in the medieval period were ovens of this type.
- Coal-in ovens—usually made of iron in period, these ovens have a fire chamber in the lower part of the oven with the baking part above, similar to a modern range oven. A fire is made in the bottom and allowed to burn down to coals, and then the food is placed above to bake. There is generally a small door at the rear of the coal chamber to allow more coals to be added as needed to keep the oven hot. Ovens of this type are common in the Colonial era of America, but rarer in period. Most period ovens of this type were for the very wealthy in the Renaissance, although small ovens of this type were used by armies on campaign for baking bread.
- Supplemental non-period equipment
- Propane or white gas stoves
- They are faster and more efficient that wood fire for boiling water.
- Small box ovens are available for use on these types of stoves. If you have no other way to have an oven in camp, this is an easy way to have one.
- Charcoal grilling—is really only good for cooking meat quickly. Cannot be used for most other cooking techniques, and has been known to melt pots.
- Propane or white gas stoves
- The fire pit or hearth: Your fire pit may be above or below ground, but should be fairly large—at least 6 square feet of cooking surface. You should also have multiple grills and a way to raise or lower the cooking surface to bring it closer or further from the fire.
- Period Style Foods: any period recipe can be adapted to camp cooking
- Advance cooking—some dishes or prepared ingredients can be made in advance. However, with a few exceptions, it is best to use fresh ingredients. But three are exceptions.
- Pottages/soups/stews where flavors are enhanced by refrigeration or freezing for a period of time.
- Pickles, corned beef, and other foods that require aging.
- Dishes or ingredients that are time consuming and/or more convenient to make with modern appliances such as food processors such as almond milk, meat stocks, or some sauces.
- Dried or canned ingredients can be bought in advance and brought with you, especially if they may be hard to find.
- Cooking on site
- Organize—“mis en place”—everything in its palce. Having all of your ingredients prepped and ready where they are needed BEFORE you start cooking the dish. Important at home, even more important at war.
- Personnel—make sure that you have enough help, and make sure they know what is expected of them. This is where a written schedule is very handy.
- Fuel—make sure that you have enough chopped wood, both kindling and larger pieces to get you through your meal and clean-up.
- Supplemental purchased foods—as mentioned before, do not be afraid to purchase some items—your ancestors did.
- Clean-up: there is no one as rude as the cook that leaves a mess for others to clean up.
- Clean up as you go along as much as possible.
- Make sure everything you want to save is saved by you—bag it, wrap it, and put it away before clean-up starts.
- Have a clean-up crew in place. Make sure they know where everything goes.
- Cover all garbage; pick up all dropped food at once. Flies are a problem—don’t encourage them.
- Advance cooking—some dishes or prepared ingredients can be made in advance. However, with a few exceptions, it is best to use fresh ingredients. But three are exceptions.
- Keep records
- Keep a file or journal so you can make notes about what worked and what didn’t, any changes that you want to make, and so on.
- Keep copies of all your recipes and menus, both for you, and to share.
- Take pictures of your food. Special meals should be recorded.
- Enjoy the History: In recreating period recipes and using period cooking techniques you become a living history cook—an uncommon experience for even the most experienced SCA cooks. Enjoy this moment, and enhance it. Wear period style aprons and serve your dishes on period style dishes. Do some period presentation dishes if you’re up for it. And remember, cooking is the only art form that nourishes the body as well as the soul.
Making cooking fires: Fire must be started at least 1 hour before the cook needs it to be ready, so you will have to check with the cook for an exact time. Once made, you must stay to tend the fire. They don't stay perfect for cooking by themselves. Making a cooking fire is only slightly different than making a camp fire. You start the same way. Make either a pyramid or overlapping triangle of kindling. Put a couple of fire starters, or some wood shavings in the center with a piece of crumpled newspaper. Squirt a small amount of tiki torch fuel over the wood. Light it and get out of the way. Once the kindling is burning well, add larger pieces of wood. As those catch, add more wood until you have the size fire that you want.
There are basically four types of cooking fires: 1) coals only--used for baking in an oven and slow cooking over the grill; 2) coals with low flames--used for frying and grilling meat, poaching and stewing; 3) coals with medium flames--used for grilling small cuts of meat or vegetables, stir-frying, and sautéing; and 4) coals with high flames—used for boiling.
To achieve coals, allow the wood to burn down completely to glowing coals the same as you would with charcoal in the barbeque. If the coals are needed for more than 20 minutes (that's about how long they burn at even heat before going out), you will have to have a second fire going to produce new coals, which are then shoveled under or around the cooking food. For any kind of cooking in an oven, you will probably need to do this. Once you have coals, it is easy to add wood to get high or low flames. High flames (a hot fire) take about 5-10 minutes after you have coals, and low or medium flames take a little longer.
RECIPES
Applesauce serves 12; adapted from The Vivendier
6 apples
3 Tablespoons unsalted butter
1/4 teaspoon salt
1 dash saffron
1/2 cup heavy cream
3 egg yolks
1 Tablespoon cinnamon-sugar
Peel the apples and slice. Boil in water until softened. Drain completely. Melt butter in a large skillet and add the apples. Sauté, adding the salt and saffron until all the butter has been incorporated into the apples. Remove from heat and cool slightly, then puree. (At this point apples may be double bagged in zip-locks with air squeezed out and chilled. Keep cool in a cooler until needed.)
Place the apple puree in a pot and heat over medium-low heat. Beat the egg yolks then stir the cream into the yolks and mix completely. Add the cream mixture to the apple puree and stir in completely. Cook and stir until slightly thickened.
Serve warm or room temperature sprinkled with cinnamon sugar.
Compost—A pickled relish serves 12-16; adapted from To the King’s Taste by Lorna J. Sass
2 2/3 cups water
1/3 teaspoon salt
1/8 head cabbage, coarsely shredded
5 ounces small turnips, peeled and minced
2 small carrots, peeled and chopped fine
2 parsnips, peeled and chopped fine
1 pears, peeled, cored, and cubed
2/3 cup sweet red wine such as Muscatel
1/3 cup red wine vinegar
2 teaspoons honey
1 1/3 dashes cinnamon
1/3 teaspoon whole cloves
1 thin slice fresh ginger root
1/3 teaspoon aniseed
1/3 teaspoon fennel seed
1/3 teaspoon mustard seed
1/3 teaspoon cubebs
3 tablespoons raisins
Make a bouquet garni by wrapping the cloves, ginger, aniseed, fennel seed, mustard seed, and cubebs in a piece of doubled cheesecloth and fastening the top securely. Bring the water and salt to a boil in a large pot. Add the bouquet garni and all the vegetables. Reduce heat to medium and cook 10 minutes. Add the pears, raisins, and currants and cook another 10 minutes.
Drain over a colander. Discard the bouquet garni and return mixture to the pot and set aside.
In the top of a double boiler, combine wine, vinegar, and honey. Heat to just boiling over medium heat and add cinnamon, stirring until blended. Pour this syrup over the mixture in the pot and stir until all the solids are coated. Allow to stand for several hours, stirring occasionally. Store in airtight containers or doubled zipper bags and refrigerate or keep cool in a cooler until ready to serve.
May be served cold or warm.
Mushrooms and Leeks serves 8; adapted from To the King’s Taste by Lorna J. Sass
1 large leek, washed and sliced into rings, discarding roots and green tops
2 Tablespoons butter
1 pound assorted mushrooms, washed and quartered
1/2 cup vegetable broth (or chicken broth)
1/4 teaspoon powdered ginger
1/2 teaspoon salt
1/4 teaspoon black pepper
Sauté leek rings in butter in a heavy skillet over medium heat until they begin to wilt. Add mushrooms and toss to coast. Add the broth and spices. Cook, stirring, until mushrooms are soft and liquid is nearly evaporated, 2-5 minutes. (The leftover broth is a surprisingly tasty soup.)
Roast Lamb with Cameline Sauce serves 10-12; adapted from numerous sources
Cameline Sauce
1 thick slice French bread, toasted
1 1/2 cups red wine
1/3 cup raisins
1 pinch ground pepper
1/4 teaspoon ground cinnamon
1 pinch cloves
Lamb
1 whole leg of lamb, bone in, excess fat trimmed
1 bunch fresh rosemary
salt and pepper to taste
Make Sauce: Soak the raisins and bread slices in the wine until the bread is completely soaked. Put all ingredients into a blender and blend until smooth. Strain through a sieve, mashing to extract as much juice as possible. Heat over medium-low heat until just thickened. Bottle until needed in Tupperware and keep cool but not frozen. Allow to come to room temperature and shake well before serving.
Lamb: Rub lamb all over with salt and pepper. Cut small slits over lamb and insert pieces of rosemary. Roast over hot coals, 4-6 inches above coals for 30 minutes, turning once. Raise lamb to 12 inches above coals, replenishing coals as necessary, and cook about 10 minutes per pound, turning every 15-20 minutes. Check with instant read thermometer for doneness. Serve lamb whole on platter, with sauce on the side.
Roman Noodles serves 16; adapted from Platina
3 pounds fettucini noodles
1 stick butter, cut into small pieces
1 cup Parmesan-Reggiano cheese, grated by hand (do NOT buy pre-grated cheese)
3 Tablespoons sugar
1 pinch saffron
1/4 teaspoon cinnamon
Cook fettucini according to package directions. Drain and return to pot off of heat. Add butter and cheese and toss until butter is melted and noodles are coated. Mix sugar, saffron, and cinnamon and sprinkle over the top of the noodles. Serve hot.
Spanish Balls serves 12-16; adapted from Dining with William Shakespeare by Madge Lorwin (a favorite in my camp)
2 pounds ground beef
8 ounces ground veal (the recipe calls for chilled and diced bone marrow, but this may be hard to find)
2 teaspoons salt
2 eggs
1 Tablespoons finely chopped flat leaf parsley
1/2 teaspoon ground cinnamon
1/2 teaspoon pepper
4 Tablespoons olive oil
6 cups beef broth (canned or homemade)
12cup red wine (Burgundy is good)
Mix the beef, veal or marrow, salt, eggs, parsley, cinnamon, and pepper. Mix well with your hands until ingredients are distributed evenly. Place in a large zip lock bag(s) and seal. Place this in another zip lock bag and seal. Freeze until needed.
Thaw meat. Form into 24-32 meatballs about the size of golf balls. Each person eating should get 2 meat balls. Heat the broth and wine in a pot over medium heat to steaming. Heat the olive oil in a large, deep frying pan over medium high heat; medium flames. (The pan should be large enough that all meatballs will fit in it in a single layer.) Lightly brown the meatballs on all sides quickly. Reduce heat to simmer; move pan to low flames, and pour the hot liquid over them. It should just cover them. If it doesn't, add more wine. Simmer for 15-20 minutes, turning the meatballs over once halfway through cooking. Remove from skillet with a slotted spoon and place in serving dish. Cover with foil to retain heat until ready to serve. The liquid can be boiled down for a sauce if desired.
Wheat Porridge made with Almond Milk with “Angel Food” Topping serves 26; adapted from Platina (breakfast with style)
1 28 oz. box Cream of Wheat (2 1/2 minute cooking variety--do not use instant)
1 1/4 gallons almond milk
2 teaspoons salt
Almond milk:
8 cups blanched almonds
2 gallons water
Menyar d’Angels (angel food):
1 pound ricotta cheese
1 cup sugar (or to taste)
4 teaspoons orange flower water (optional but very good)
Almond milk: You can now buy this product ready-made, although it's not quite as "almondy" as the homemade variety.I include a recipe for making it for the adventurous among you. Make in 2 batches. Grind the almonds in a food processor with 2 Tablespoons of cold water per batch. Place this in a large pot. Boil the water in a separate pot. When it begins to boil, pour it over the ground almonds. Stir, then let this sit for 30 minutes. Stir and cool completely. Strain this through a coarse sieve or colander lined in cheesecloth. Bottle in air tight containers and refrigerate until ready to use. You will end up with about 1 ½ gallons of almond milk. (This keeps fine in a cooler in cleaned plastic milk jugs—use screw tops only and seal these on with duct tape. Make sure your milk jugs are sturdy and have no dents or holes.)
Mix the almond milk and salt in a large pot (8 qt. capacity) and bring to a boil. Gradually add the Cream of Wheat, sprinkling it gently across the top while stirring constantly until entire amount is well blended. Return to a boil, then reduce heat to low; simmer, uncovered, until thickened; at least 5 minutes, stirring frequently. When done remove from heat and keep warm by covering with foil.
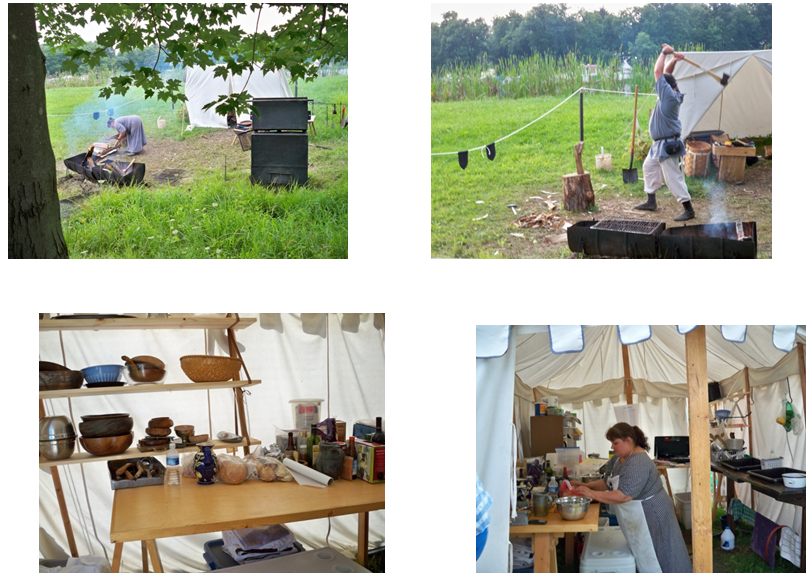
These are pictures of the indoor and outdoor parts of our camp kitchen at Pennsic War.